Hyperspace User Manual
Download PDF
Algorithms
Algorithms can be looked at as 2 parts: Structure and Values.The structure is the routing of the processors. These structures are often very complex and can have hundreds of processors running in series and parallel with feedback networks. These processors often include delays, allpass filters, comb filters, vibratos, saturation, filters and more.
Values are the settings of the processors. Each delay has a delay time, each feedback has a send amount, each filter has a frequency value and it is all these values that make up the character of the reverb sound.
These values cannot be set without great care as each value for each processor has an effect on the others and with such complex structures, there is an almost infinite number of value sets. When not tuned correctly these sets of values can lead to many undesirable characteristics of space including decaying to one side, resonances, fluttering, unequal frequencies and unrealistic echo density build-up. Although this happens in the natural world, it is not ideal for use in a mix. So we used machine learning to qualify over 20 million sets of values and selected only the best sets for this plugin. This makes the sound of Hyperspace not just realistic but also sonically stunning.
At the heart of Hyperspace are the XY pads and these control the balance of these structures, routings, values and settings for the algorithms. This makes for an almost infinite number of algorithms. What's more, is these algorithms are created by you in an extremely intuitive way. Simply use the pads to get a great sounding reverb that is unique to you.
You can not really go wrong, as all the values have been meticulously set offering you only the best possible sounding combinations.
Global Section

Wet - Controls the level of the processed signal.
Link - Makes "Wet" control "Dry" so that they both equal 100%. This is how most plugins work, however here you can use the two controls unlinked to get 50% Wet and 100% Dry for example.
In - Is the first stage in the signal chain and controls the input level for everything.
Out - Is the last stage in the signal chain and controls the output level for everything.
Link - Makes "In" control "Out" by opposite values. This can be useful to boost the input and then compensate with the output so there is no additional overall volume.
Preset box - Uses the back and forward arrows to move between presets. Clicking in the box opens the preset browser, where you can save, load and name presets.
![]()
Copy - Takes the settings from the currently selected A or B slot and copies them into the other slot.
A & B - Switches between two states of the plugin. This can be used to make better decisions by directly comparing the before and after.
Bypass - Disables the plugin's processing.
! - Panic - Resets the plugin's processors.
Lock - Protects all the setting in the toolbar from changing when loading presets. This is useful for example if you want to keep Wet at 100% but the preset has it set at 50%.
Undo/Redo - Will revert back one step to help avoid the accidental change of parameter values.
Activate - Opens a browser to locate the licence file to unlock the full version.

Dice - Are intelligent randomizers that generate settings in the plugin.
One randomizes the XY pads, therefore only changing the sound character of the reverb without changing the main controls.
Three will randomize the most common settings associated with reverb, it generates sensible values. It is good when you want to just quickly hear different reverb setups to see what works well for your audio.
Five generates full random chaos, this can often sound very creative.
Pink Section

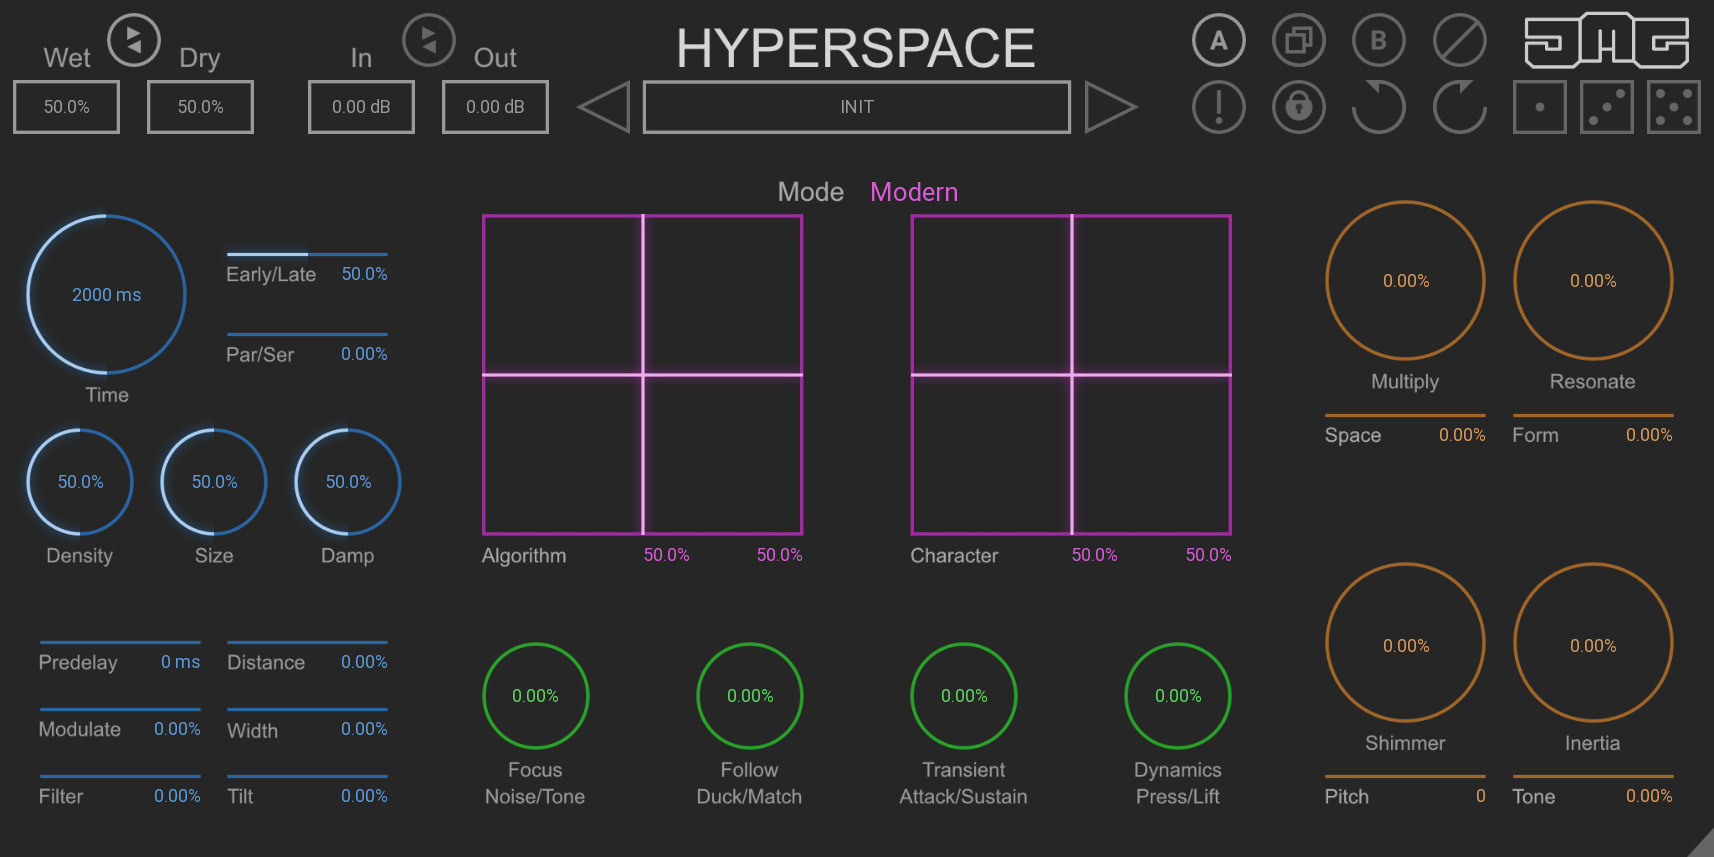
Mode - Selects from 6 options: Vintage, Classic, Retro, Modern, Sci-Fi and Cosmic.
Each of these modes loads 2 structures and their value sets into the Algorithm XY pad.
Algorithm - Is an XY pad that controls the structures and values of the algorithm.
X-Axis crossfades between structures.
Y-Axis Interpolates between many sets of machine-learned internal values.
Character - Is an XY pad that controls the sound character of the algorithm.
X-Axis skews all the delay times in the algorithms.
Y-Axis morphs frequency ranges and internal routings for the algorithms.
Blue Section
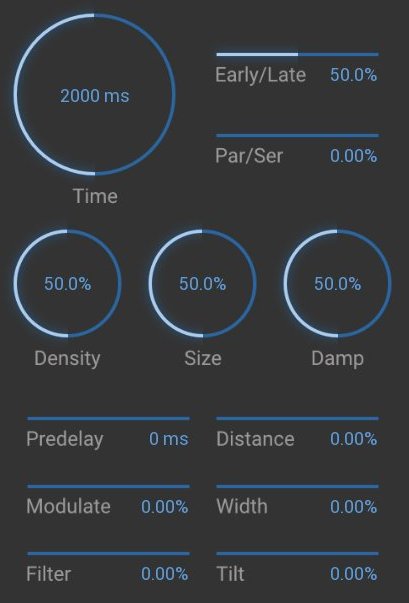
Time - Controls the RT60 measured in milliseconds. It is the amount of time it takes for the reverb level to drop by 60db, therefore, it controls the length of the reverb tail. Be aware that due to some of the special feedback algorithms this will not always be accurate.
Size - Controls the virtual size of the room.
Damp - Controls the amount of dampening. Higher and lower frequencies get absorbed by walls, objects and even the air. Different materials will dampen the signal by different amounts. So in a way, this controls the type of room.
Density - Controls the complexity of the algorithm. Typically higher values sound fuller and richer. However, it uses more CPU. Also, lower values can sometimes be preferable, it depends on the context.
Early/Late - Controls the balance between early and late reflections.
Early reflections are the first sound reflections and tell your brain the shape and size of the room.
Late reflections make up the decaying tail of the reverb as the echo density builds up.
Lower values increase the presence of the room and reduce the late reflections, this can be beneficial for shorter reverb times or to add character to a sound without too much of a reverb tail.
Higher values reduce the presence of the room, this can be useful for more creative uses where realistic room simulation is less important or for outdoor spaces.
Par/Ser - Controls the balance between parallel and serial routing of the early and late reflections.
Parallel means both the early and late reflection generators will listen to the input.
Serial means the late reflections generator will listen to the early reflections generator, this creates resonances and diffusion.
Lower values offer almost no resonance which is desirable for a clean and transparent sounding reverb. Although resonance is a natural characteristic of a room, lower resonance is usually considered better and typically works well in a mix.
Higher values can be used creatively and are great for creating metallic alien-like textures.
Predelay - Controls the length of time before the reverb signal starts.
Filter - Controls the frequency of a high-pass and a low-pass filter. Negative values use the low-pass, and positive values use the high-pass filter. The default central position has no filtering. This can be useful to cut out unwanted low muddiness or ear piercing high frequencies.
Modulation - Creates variations in pitch to the input signal of all generators. Lower values can help to make the reverb sound more realistic by making it less repetitive. In the natural world reverberation changes over time, this can be caused by people moving in the room, changes to the air pressure and other random factors.
Higher values can be used creatively and can sound like a chorus effect.
Tilt - Controls the tone. Positive values increase higher frequencies and reduce lower frequencies. Negative values do the opposite. This control is useful to make the reverb space sound brighter or darker.
Distance - Simulates the distance between the sound source and the listener.
Width - Controls the stereo content of the reverb. 0% is a natural-sounding stereo space. Negative values progressively narrow the stereo field all the way down to mono. Positive values increasingly offset delay times in the algorithms between the left and right channels to create super-wide stereo fields.
Orange Section
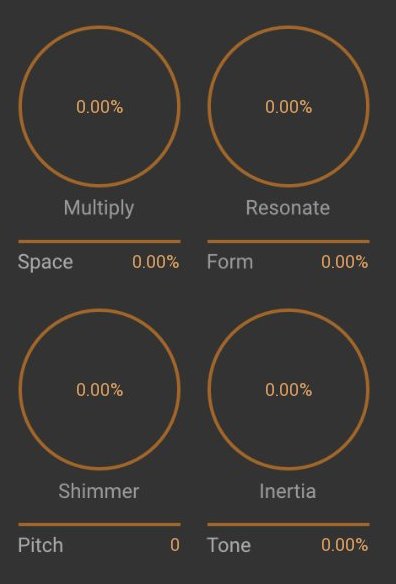
Multiply - Creates many delayed copies of the early reflections each with feedback. The XY pads will change the delay times, feedback levels and pan positions, therefore changing the sound character of the effect.
Space - Controls the amount of time between each copy, stretching or shortening the length of the effect.
Resonate - Is a series of comb filters that create a metallic-sounding resonance to the reverb. The XY pads will change the delay times, feedback levels and pan positions, therefore changing the sound character of the effect.
Form - Modifies the distribution of the delays, which sounds like it changes the shape of the resonating object.
Shimmer - Is a pitch shifter that is inside the reverbs feedback network.
Pitch - Controls the frequency of the shifter in semitones.
Inertia - Is a special processor that extends the length of the reverb decay, creating very long tails. This is great for creating huge drone effects, soundscapes and textures.
Tone - Controls the dampening of this effect which is useful to make the tail get increasingly darker or brighter.
Green Section
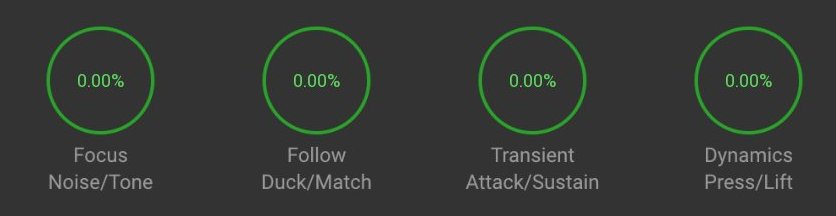
Focus - Uses spectral processing to separate the noisy and tonal elements of the signal.
Negative values will reduce the amount of reverb for tone and increase for noise. This can be used to bring focus to the musical elements of the audio while still keeping a good amount of reverb in the less important noise component.
Positive values will reduce the amount of reverb for noise and increase for tone. This creates beautifully haunting tonal reverb tails while keeping the noise crisp and cutting through the mix.
Follow - Uses 2 advanced level followers and compares the results. Negative values will reduce the level of the reverb when the dry signal is present. This can be used subtly to help the sound not get drowned out with reverb and brings it forward in the mix. Or used more extremely to create cool pumping effects.
Positive values will make the reverb level match that of the dry input amplitude envelope. It can be used subtly to tighten up the reverb. Maximum value will exactly match, so can be used if you do not want to change the amplitude envelope of the sound but still add the reverbs sound character.
Clarity - Separates the transient and tail components, which we will name attack and release.
Negative values will reduce the level of the reverb for the transient allowing it to cut through the mix, while still retaining a good amount of reverb tail.
Positive values will reduce the level of the reverb for the tail and increase the reverb for the transient. This creates a percussive reverb that keeps the tail clear which usually has more tonal content
Dynamics - Is a pre reverb dynamics processor.
Negative values will reduce the dynamic range of the reverb. Having too much dynamics in the reverb tail can sometimes clutter a busy mix, so this is useful to make the tail more consistent.
Positive values will reduce the amount of reverb for low-level content.
Quieter elements can sometimes be considered less important than louder elements. Therefore this will lift the reverb away from the quiet parts to help it sound less busy. For example, it could be used on a drum mix to focus the reverb more on the snare and less on the hi-hats.
Right-Click
Right-click anywhere in the plugin background with the right mouse button and you will get access to following features.
Change oversampling settings (Plugins that support oversapling only)
Scale GUI precisely by per-cent.
Get the version info.
Access product web page, reach support and access online documentation.
Contact support
Open presets folder (to add, arrange or delete presets manually)
Activate/Deactivate the plugin
Access Licence manager (to activate or deactivate the plugin or several plugins at the same time)
Disable/Enable GPU Acceleration.
Disable/Enable Intellingent sleep on silence function that disables the plugin when no sound is on input or output to save the CPU power.
Right-click any control (knob, button) to access help for the particular parameter.
Auto - Activates the auto-gain mode. This measures the loudness of the input and adjusts the output to match. This can be useful for avoiding the "louder sounds better" problem.
Eco - Enables a lower CPU mode. It will often sound different to the default mode, however, this may be desirable. The eco mode is actually still extremely high quality, it just uses a different system for dampening, modulation and other processes.
X2 - Enables oversampling. This typically improves the sound quality however this is not always the case and it uses additional CPU.
? - Help - Loads the help document, you are reading it now :)
Limit - Enables a safety limiter on the plugin's output.
Double-click Menu
Some parameters let you access more accurate numeric settings by double-clicking the knobs.
Presets and left-right arrows
The plugin comes with a set of presets, which should do the trick for most cases or give you a good starting point when tweaking your sound. Access them using the right and left arrows, or by clicking the preset field directly. You can save and manage your own presets there as well. In your computer, presets are stored in the following paths:
Windows:
C:\Users\username\Documents\JMGSound\Hyperspace
macOS X:
HOME/Documents/JMGSound/Hyperspace
Installation and maintenance
Installation is a quick and simple process involving downloading and using a standard installer on both platforms, Windows and Mac OS X. The installer places the plugins and presets into proper locations so that your DAW can easily find it. The plugin is available for all relevant interfaces: VST, VST3, AAX and AU. Note that on OS X since High Sierra you may need to restart your computer to make your DAW find new plugins.
If you find yourself in trouble, please contact us via support@unitedplugins.com.
Updating
Updating the plugin to the newest version is as simple as using the newest installer.
Uninstallation
Windows
You can either use the link to the uninstaller in the start menu by typing SubBass Doctor 808 for example or it can be accessed via Control panels / Applications /
macOS X
First delete the plugin files manually from :
AU: /Library/Audio/Plug-Ins/Components
VST: /Library/Audio/Plug-Ins/VST
VST: /Library/Audio/Plug-Ins/VST3
AAX: /Library/Application Support/Avid/Audio/Plug-Ins
Then if you really want to get rid of all data created by the plugin, remove the following folders as well:
HOME/Documents/JMGSound/Hyperspace
HOME/Library/Application support/JMGSound/Orbitron
Note: Since OS X 10.7 (Lion), many folders are marked as hidden by default. To make them visible again in Finder, please follow this tutorial:
https://ianlunn.co.uk/articles/quickly-showhide-hidden-files-mac-os-x-mavericks/
Trial and activation
Orbitron is initially in demo mode, which lets you evaluate the plugin. Try it in your mixing/mastering sessions and make sure it really does the trick. When ready, purchase a licence from our shop or any of our resellers. You will receive a so-called licence file, which you download to your computer. The plugin displays an ACTIVATE button when in trial mode. Click it and select the licence file. The plugin will check the licence and activate the licence on your computer. After you restart your DAW, the plugin will be activated and will work indefinitely without restrictions. You can use the plugin on all your computers.
Support
Now that you’ve taken the time to learn all about Orbitron, enjoy and make your sound awesome! If our plug-ins helped you take your production to the next level, let us know, we’d love to hear from you and what you were able to create with our software.
If you encountered any problems, we offer free technical support for all registered users. Start with the frequently asked questions here:
http://www.unitedplugins.com/faq
If you need further assistance, you can find our Customer Support contact form at:
http://www.unitedplugins.com/contact
You can also reach our support staff by e-mail at:
support@unitedplugins.com